

|
|
|
|
|
|||||||
| Electrics & Lighting All discussions related to bike electric, lights, bulbs, fuses and wiring. |
 |
|
|
Thread Tools | Display Modes |
|
#
1
 11-11-13, 20:28 11-11-13, 20:28
|
|||
|
|||
|
heated grips
Hi guys, any good for fitting them? Straight to the battery or ignition live? If ignition live where do you pick the feed from?
Posted this in another section earlier but then noticed this one, excuse the durr moment! |
|
#
2
11-11-13, 20:39
|
|||
|
|||
|
you could wire direct to battery but if you forget to switch them off, or a fiddling oik switches them back on for you, then you will soon get a flat battery. Better to either splice into an existing switched circuit that can take the additional load (radiator fan live is a good one as its unlikely the fan will be on at the same time as your heated grips); or even better, both splice into a switched circuit AND feed the grips via a relay. If you use a relay you can splice into any switched circuit regardless of the current it would normally draw as you are only using that circuit to trigger the relay.
Good luck with the install. I use Dr Bike grips on the basis that they are the cheapest I can find and seem to be a copy of old model Oxford heated grips that are twice the price. ALso a nice easy to use dial type switch. J&S accessories. |
|
#
3
11-11-13, 20:45
|
|||
|
|||
|
I'd go for a the fused relay option - a much more safe and reliable solution in the long run.
On the XTZ you have several choices for getting a live feed, the most popular are by tapping into either the brown feed to the rear brake light switch, or the blue/red feed to the tail light; whichever is the easiest to get to. Those two are good options if you're mounting a relay under the seat. The other alternative is the spare connector under the dash, behind the panel below the clocks. Be aware that the tail lamp option and the spare connector under the dash are both live when the key is in the 'P' position and removed. |
|
#
4
11-11-13, 20:47
|
|||
|
|||
|
If you ever park in public you don't want the possibility that someone turns them on and drain tour battery ....
I've used a relay and controlled it by the switched power from behind the headlights. I've hidden the relay in the side of the fairing. http://www.tenere.dk/forumnew/forum_...ID=72331#72331 It is cheap grips from hein gericke with a controller from mccoi.de
__________________
2011 Yamaha XT660Z ABS T�n�r�. 

|
|
#
5
11-11-13, 22:55
|
|||
|
|||
|
So am I right in saying you have used the switched wire behind the dash as the 12v feed to the relay? Or do you still need to run a 12v feed from the battery as well, quick description of what wire goes where would be dead handy, I'm pretty good with wiring but sometimes need a little pointer!
|
|
#
6
11-11-13, 23:42
|
|||
|
|||
|
Only use the ignition switched feed to trigger the relay. The supply to power the grips must come straight from the battery (via a fuse) and connected through the load terminals on the relay.
Here's a circuit diagram I did for wiring lights. Same principle applies to wiring grips (but you might not necessarily want to include the isolation switch). 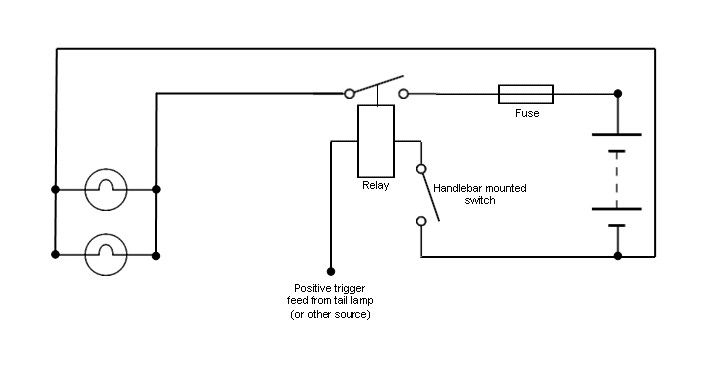
|
| Sponsored Links |
|
#
7
11-11-13, 23:50
|
|||
|
|||
|
So, 4 pin relay
1 to earth relay 1 to + side of battery with inline fuse 1 ign live trigger wire 1 wire to heated grips Sounds good to me, I suppose now just a case of finding a suitable place for relay |
|
#
8
12-11-13, 00:14
|
|||
|
|||
|
Quote:
Quote:
|
|
#
9
12-11-13, 07:29
|
|||
|
|||
|
Quote:
try google for a picture of a relay intallation. This is just one of the fist hits. 
Just forget atbout the switch that triggers the relay and wire you switched 12V directly to the relay. Enstead of the lamps you connect the controller for the heated grips.
__________________
2011 Yamaha XT660Z ABS T�n�r�.
|
|
#
10
12-11-13, 13:41
|
|||
|
|||
|
My post from another forum:
So I bought some heated grips (well, tis the season) from www.windingroads.co.uk Thought I'd let you know how I got on with fitting them. This is what comes in the package: 
As you can see, they aren't heated grips, but heat pads (kinda like underfloor heating) This means you can keep your existing grips which is what I wanted to do. They draw a maximum of 3A, my bike has about 9A to spare so this is fine (check your user manual) However, I didn't want to forget to turn them off and come back to my bike to find a flat battery. So i needed to find a way to make sure they only came on when the key is in the ignition First thing then - A fused relay. A relay allows a circuit to be switched on when it receives current from another circuit. What I've done is to use the rear tail-light as the switch (only comes on when the key is in the ignition) This is how it works: 
When current flows through the 'Switch Live' (i.e. when the tail light is on) the coil draws the plunger towards it through electromagnetism, thus closing the circuit and allowing current from the battery to flow to the grips. Here you can see the 3A fuse inline and the relay being fitted: 
Bits I needed: Fuseholder 3A Minifuse 14A 12VDC Relay 17A cable (one red, 1 black) 5m each Various crimp terminals (rings, bullets and sheathing) Heatshrink I got all my bits from CPC, but you can get them from Halfords, Maplin, or any car parts store. Next, tap into the tail light circuit to provide that 'Switched Live' I snipped the positive wire of the tail light, and added another cable to go to the relay. Where I snipped, I added a bullet connector each end, reconnected and heatshrinked it. 
The blue crimps are for easy reconnection, the heatshrink prevents any cables from coming loose at a later date. Final stages here are to connect the battery live and battery ground terminals to the relay(I used ring terminals directly onto the battery) And here it is in place: 
Looks like it was part of the original wiring, doesn't it? Good, it's supposed to! (Clue, it's held on with a cable tie) So the next step is to create a small loom to run to the handlebars, the positive comes from the relay, the negative runs straight back to the battery. So I took my two 17A cables, measured the length and then heatshrinked them together. 
Very boring job but neat and tidy. This ran under my seat, under my tank until it met the original forward wiring loom where i cable tied it to that and ran it to where I wanted the switch on my handlebars. Make sure you still have correct movement in your handlebars! Ready for the grips! There are 3 items you will need now: 
WD40 - To remove the grips... lift the edge of the grip, give it a good soaking inside and give it a wiggle. Most should come off easily enough. Switch cleaner - Or any IPA-based solvent (No, not Indian Pale Ale... IsoPropylAlcohol!) After your grips are off, give the bars a thorough clean, dry and then do it again to be sure! No sticky bits! We'll come back to that last can in a minute. The heat pads go on easily enough, they have a sticky backing but I made sure by wrapping them in electrical tape to hold them in place. You'll want to place them about 1/2" from any controls. The throttle is a little trickier, as you need to make sure the cable can move as you twist the throttle. Here's one fitted: 
They don't fit all the way round the bar, so I placed the gap where the palm of my hand would be. We want heat on our fingertips at the front! I placed it so the cable can travel with the throttle and also is well away from controls in that area. Once it's stuck down it's ready to use that last can: Hairspray??? - Yes, hairspray. I found this is the best way to get the grips back on again after. Once you've fitted the heat pads on, give them a liberal soaking of hairspray and the grips should just glide back on. Eventually, the hairspray will set solid, like glue. Sorted! 
Now, we need to fit the switch and complete the wiring. The switch can be mounted into a fairing or panel (requires a 19mm hole), or you can do what I've done here and just mounted it on my handlebars for easy access. 
The bracket for mounting is included in the kit. As you can see, the switch has a Hi and Lo setting. Both of these need to run to each grip. Also, from each grip there is an earth/ground which needs to run back to your battery Here is a final wiring diagram: 
The last thing to do is to tidy up all the wiring, cable ties are your friends here! I also put heatshrink over all the connectors so they can't short circuit in the rain. 
Job done, finished, put the kettle on. (Oh yeah, I also bought Tucano Urbano Muffs and I now wear summer gloves all year round!) Stay toasty, Weave.
__________________
Bike: 2013 XT660Z, TKC70 tyres Mods: Barkbusters, Scottoiler, DIY Tail Mod, DNA Stage 3, Power Commander V & O2 Eliminator, Exan X-Black Stainless exhaust, Tool tube, Ohlins linear front fork springs, Nitron rear shock, JT front and Supersprox rear sprockets, D.I.D. VX 520 chain, Adventure Spec bashplate, DIY USB Outlet, DIY chain guide, Kev's Throttle mod http://www.facebook.com/onemooseonemotorbike 
|
|
| Thread Tools | |
| Display Modes | |
|
|
|
|


 Linear Mode


